Have you ever gone to sign in to Microsoft app (e.g. email or OneDrive) entered your email address and been presented with the following prompt ?

This means the email address that you entered is associated with more than one Microsoft Account. This article will explain why this happens and what you can do about it. The links to fix the issue are immediately below. For the explanation on how to use them, read on….
Change Primary Email Address (select “Make Primary”)
Delete Old Email Address (select “Remove”)
Microsoft Accounts
Whenever you use a Microsoft product for the first time, you will be asked to identify yourself with an email address and a password. Together, these two items define a “Microsoft Account” to which the product is registered.
If your work uses Microsoft 365 Business for email then your email address will be registered using that address and a password. Suppose your name is “john” and you work for “mycompany.com”. You IT person creates your email address and gives you the password Pkx37823! (because IT people like meaningless passwords). So far so simple. If we stopped at this point then whenever you signed in to the Office 365 webmail app you would enter your email address and password and be taken straight to your Inbox.
Where it starts to go wrong, however, is if you personally purchase another Microsoft product.
Suppose you personally purchase Microsoft 365 Family (which gives you Word, Excel, Outlook etc.) for your home PC. This requires you to purchase a license which must be registered to a personal “Microsoft Account”.
At this point you may not have a personal Microsoft account – only a business email account. So you are asked to create a new Microsoft account (for free) to register your purchase. When the Microsoft account creation process prompts you to enter an email address you might enter your business email address (since that’s the one you use most) followed by a password that you make up on the spot because you can’t remember the meaningless one the IT person gave you. You like elephants so you create the password 3elePhants. Microsoft now creates the personal account for you. All this happens seamlessly, without any problems.
But now you have TWO Microsoft Accounts – your original business email account, and the new personal account you just created. What’s more, they BOTH use the same email address but have different passwords.

Now, whenever you sign in to a Microsoft service and enter your email address, Microsoft cannot tell which of your two Microsoft accounts you are using. Since the passwords are different it needs to know which password to expect so it prompts you to choose which Microsoft account you are trying to sign in to, so that it know which account to verify the password against.

There is another way this issue can arise if you have ever setup a Windows 10 PC or Laptop from new. Early on, during the Windows 10 setup process, you may be asked to sign in using a Microsoft Account. If you don’t already have a Microsoft Account you’ll be prompted to create one – so you might enter your business email address and Microsoft creates a personal account for you, with the same email address as your business account.
Confusion
If you are not already confused, then things go downhill from now. Firstly, you’ll probably be unaware that you even have the two Microsoft Accounts. Secondly, you may not actually have an “IT department” at your business so how could they have created an account for you ? Thirdly, what’s a “school account” anyway ?
And then the passwords you use for each account may well be different. So if you use the correct password on the wrong account you won’t be able to login and may even get locked out of your account if you try too many times !
To confuse things further, sometimes the actual prompt you will see may be slightly different to those examples above and may even mention a “University account”.
So how can you fix this problem ?
Delete the Personal Account ?
You could delete the personal Microsoft Account. That would work.
But if that account was used to make a purchase or you use that account to sign in when you start your computer then deleting the account may well lock you out of your purchases or even lock you out of your own computer !
The personal account must have been created to register a product or service originally, so if you wish to continue to use that product or service then you cannot delete the account. Furthermore it is not possible to transfer Microsoft product licenses to another Microsoft account.
Fixing the Problem the Right Way
The correct way to resolve this issue is to change the email address associated with the Microsoft Personal account. This retains both accounts but means that they use different email addresses to distinguish them.
This has to be done in a particular order –
- Add an “email alias” to your Microsoft personal account
- Make this email alias the primary email address
- Delete the original email address from your personal account
Email Aliases
An “email alias” is simply an alternative email address that is associated with an existing mailbox. Email sent to main email address or to the email alias will be delivered to the same inbox.
For example, suppose your name really is John Smith and your business email address is John@mycompany.com
You might also have the email aliases –
JohnSmith@mycompany.com
John.Smith@mycompany.com
J.Smith@mycompany.com
JohnnyBoy@mycompany.com
Email sent to any of these email addresses will be delivered to the same, single mailbox. You can add further email aliases, as required, but email sent to an email alias will always be delivered to the inbox of the primary email address which, in this case, is John@mycompany.com
Microsoft Account Email Aliases
The domain name used by Microsoft for free, personal email accounts is outlook.com
Since we want to create an email alias for a Microsoft personal account, the email alias must end in @outlook.com since this is the Microsoft email domain.
So, think up a new email address for your account that will end in @outlook.com, and be prepared to add some numbers or other variation to the address you choose as someone may already be using the address that you want.
For example, since your name is John Smith then you might want to use johnsmith@outlook.com as your email alias. But someone already has that email address so you might change it to johnsmith42@outlook.com or some other variation. When you create the email address Microsoft will check and inform you if it already in use and allow you to modify it.
To create an email alias, use this link – create Microsoft email alias
If the link does not work use the following steps –
Signin to Microsoft using your personal account
select Your info at the top of the page
select Manage how you sign in to Microsoft
select Add email address
You will first need to sign in using your current personal Microsoft Account details. Once signed in, you should see the following screen –

Now fill in the upper box (the one with @outlook.com to the right) with the first part of the new email alias you wish to use. Click on Add alias. When you do this, the email address will be checked to see if it is available. If your alias is NOT available, that indicates someone else already uses the email address. Try another variation of the email alias that you want to use.
Once you have added an email alias, you are ready for the next step.
Change the Primary Email Address
When a Microsoft account has two or more email addresses associated with it, the Primary Email Address is the one that is used for signing into the account. We now need to select the newly created alias as the Primary Email Address.
When you create the email alias, you will see the next page which allows you to change the primary address as follows –

This screen shows the current, primary email address at the top, followed by the alias that you just created. Click on the Make primary option to the right of the alias to make this the primary email address for signing in to the account. You may be prompted for the account password to confirm your identify. Enter your personal account password as normal.
This will change the screen as follows –

Make a note of this new email address as you will need it to sign in, The password for the account is NOT changed at this point.
Delete the Original Address
Now that you have changed the primary address, you can use the Remove option beside the original email address to remove it from this Microsoft account.
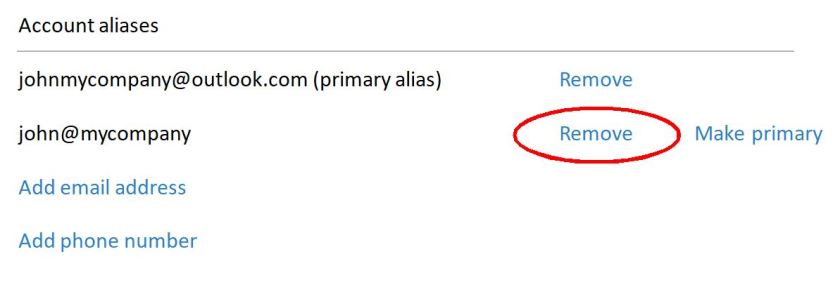
This will NOT delete your business email address – it will simply disassociate that email address from your personal Microsoft account.
Once this has been done your Microsoft accounts will be setup as follows –

Now the two accounts are completely separate, with different sign in email addresses but still the original passwords and still with the correct Microsoft services associated with each account.
